
Thursday, September 15, 2011
Tuesday, March 22, 2011
Finally, in the water.

We also managed to race her once in a DYC club race, and won! It was very satisfying after all the time I had to invest to get her back in the water.
Vinnia was re-christened "Enterprise" in an elaborate ceremony at the Detroit Yacht Club that was attended by family and friends. Looking forward to a great 2011.
Wednesday, May 26, 2010
Getting Close
Work on the Six Meter is progressing nicely. I've got the underwater profile restored to the classic configuration. The new rudder is almost complete. New deck structure almost complete. Mast step repairs complete. Stem repairs complete. Steel floors reinstalled. Broken frames repaired. Here are some photos.

A lot going on in this photo. Notice the underwater profile restored to the Rule 2 Classic configuration. Rudder is temporarily hung. Aft deck is removed. New deck supports at midship - this structure separates the fore and aft cockpits and is where the mainsheet winch and the running back winches will be located.


A lot going on in this photo. Notice the underwater profile restored to the Rule 2 Classic configuration. Rudder is temporarily hung. Aft deck is removed. New deck supports at midship - this structure separates the fore and aft cockpits and is where the mainsheet winch and the running back winches will be located.

Helpers! Steve Grimes and Joel Kar showed up to lend a hand. Notice Joel in the background wearing every type of protective equipment known to man, while Steve chooses to "tough it out."

New Rudder being built.
Monday, April 26, 2010
THE CLOCK IS TICKING!
Making great progress on the boat in the last couple months. I'm shooting for a late may/early June launch.
The mast was picked up by the guys at Offshore Spars today. They evaluated the mast and rigging and pointed out some areas for concern that are now being repaired / replaced. The aluminum mast that came with the boat had never actually been on the boat. Bud (previous owner) broke the wooden mast for the last time, ordered this new aluminum mast, but never got a chance to put it on the boat. Coincidentally, he actually purchased this new mast from Offshore about 20 years ago, the same guys that are doing the work on it.
Al and Karl from Doyle sails are scheduled to come out and measure me for some new sails this week.
I did run into some problems in the stem, that were the result of corrosion from a metal fastener. A portion of the stem was rotted out in about the last 3 feet of the stem where it joins the keelson. The tricky part was that only about a 3/4" wide portion of the 2" x 4" stem was bad, right in the middle. Tearing out the whole stem, or even the last 3 foot section with the problem, would have caused considerable damage to the boat, since all the planking and frames connected to the stem in that area were very sound. I decided to remove the 3/4" x 3ft section that was bad, and put a new piece of oak in that section. Then I "sistered" the almost the entire stem with a new piece of 2" x 4" x 10 ft oak. While I realize that this will add a little weight, it should be a sound repair for a couple years, until I get time to do a proper repair.
The new keelson is in place and looks great.
I've got my crew lined up for a little fiberglass party in a couple weeks.
The deck is repair is about half done.
I've got four frames repaired, with about six more to go. I repaired these frames by removing the bad section, and laminating oak strips in place, and overtop of a scarf joint on the existing good portion of the frame. It's an easy job, but I need another pair of hands to finish it up. Doing the first four repairs solo, was way more difficult than it should have been.
More Repairs
Two Halves of Keelson.
Top and bottom of each section bolted together and bonded with 3M 5200

Keelson Assembled - Top view
Notice stainless studs sticking out to accept metal supports in boat.

Half of Keelson installed. 3M 5200 to keep the water out.

New mast step supports over repaired stem

Top view
mast step supports and stem repair

Saturday, February 13, 2010
BUILDING A NEW KEELSON
Building a new keelson presented some real challenges that took a great deal of thought to overcome. The first challenge is that all seven keelbolts are on different angles from one another. This made is impossible to take a piece of wood, drill the holes, and slip it over the keel bolts. What we decided to do was to build the new keelson with a seam in the middle. Another reason for this decision was the difficulty in finding a piece of white oak that was 14 inches wide by 14 ft long.
The keelson was built out of four pieces of white oak measuring 1.75" x 7" x 14ft. We stacked two boards and fastened them together to create a board that was 3.5" x 7" x 14ft. Then we set the boards next to the keel bolts and traced then. Next, I took a router with a 1.25" half round bit and routed out half the hole for each keel bolt, and repeated the process on the other board.
Once we got two boards in place, they were fastened together with 1/2" stainless steel rod. When we put them in place for the final time, we will epoxy everything together also.
Now the outline of the inside of the boat and the keel need to be traced onto the boards, and the boards trimmed to size
more to come.


Wednesday, February 3, 2010
Keelson Out!
Removed the keelson last weekend, and it came out quite easy. It was really in bad shape. Notice the angled keelbolts. Adds a little wrinkle to replacing the keelson.


Subscribe to:
Posts (Atom)
Bow
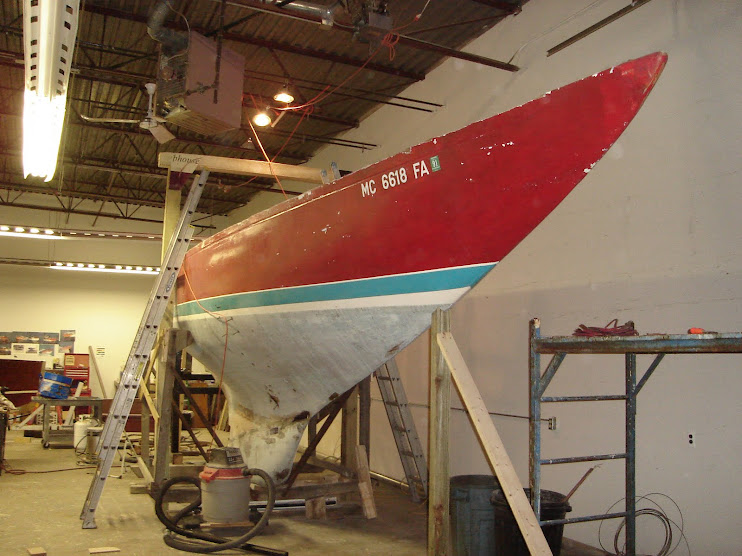
Bow 01/03/10
Stern

Stern view - 01/03/10
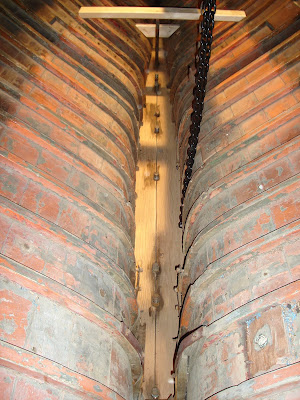
Forward Keelson
Forward Keel 01/04/10
Keel 2

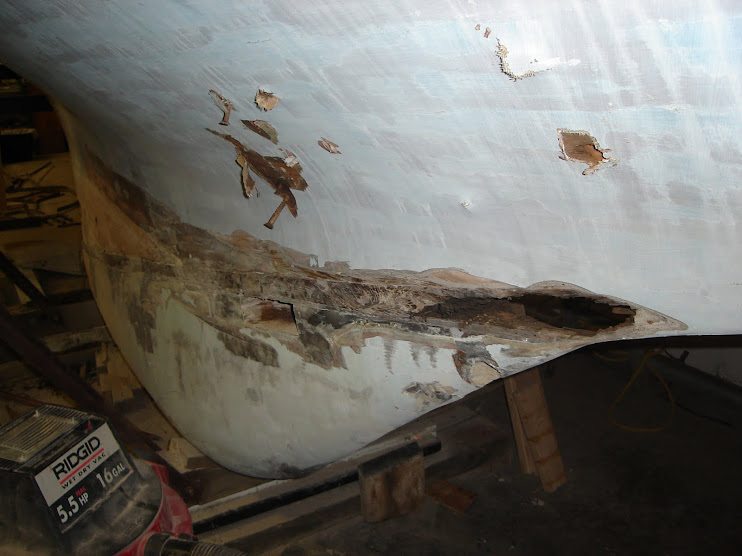
Parts!

Floors and other supports
Bilge

Bilge - this is the top of the keelson that needs to be replaced.
New Hardware!

Santa brought me some new hardware!


